Manage Your Data with ZefDB
One of the best way to learn is by example.
In this tutorial series, you will learn how to:
- Model, add, view, and update your domain data with ZefDB
- Build Data pipeline with ZefOps
- Deploy a working backend with Zef
- Build a reactive application with Zef
You can walk through these tutorials using IPython, or any of its extension:
- Jupyter Notebook,
- Jupyter Notebook in VSCode
Importing Zef
Let's import all the necessary modules for this tutorial:
from zef import DB, ET, RT, Where, Z
from zef.ops import all, collect, count, F, filter, graphviz, Ins, now, run, time_travel
or you could just do:
from zef import *
from zef.ops import *
Defining the data
One way to express your data is using the object notation as follow:
data = ET.Person(
    first_name="Jennifer",
    last_name="Lawrence",
    acted_in=ET.Movie(title="Hunger Games")
)
This expression represents how we can think of data in terms of object, which is natural if you have worked with OOP or have used ORM to represent data.
Here, we have expressed a single entity ET.Person, which fields are
first_name- Jenniferlast_name- Lawrenceacted_in- another entityET.Moviewith fieldname=Hunger Games
Instantiating DB
db = DB() # Graph()
A new database instance is created within your local Python session, just like that! ZefDB is fully embedded, you can work with it within Python and without network connections!
Adding Data into DB
Now, we want to insert the data we declared above into our database.
jen_law = data | db | run
Throughout the Zef ecosystem, you will see "|" pipe being used everywhere, which is unusual for a python library. However, the piping syntax is common across some other languages like Elixir, Elm, or most commonly seen in Unix Programming(i.e. Bash) ! In Zef, pipe is overloaded so users can chain together values, Zef operators (ZefOps), and functions in sequential, lazy, and executable pipelines where data flow is left to right.
The return value of this operation is a handle to the object that is transacted into the database.
In [7]: jen_law
Out[7]: <ZefRef #97 ET.Person slice=2>
These handles can be used for further operations (traversals, addition of data), which we will use later in this tutorial!
Exploring the Data
yo
When you are working with Zef and come across "something" and you wonder if you can get additional context about it so in your head you go:
When you are working with Zef and came across "something" that you want to have additional information, in your mind you would be thinking : "Yo Zef, show me more about this something!". yo is exactly the operator that you would use in these scenario.
yo(db)
You'll see the following in your repl:
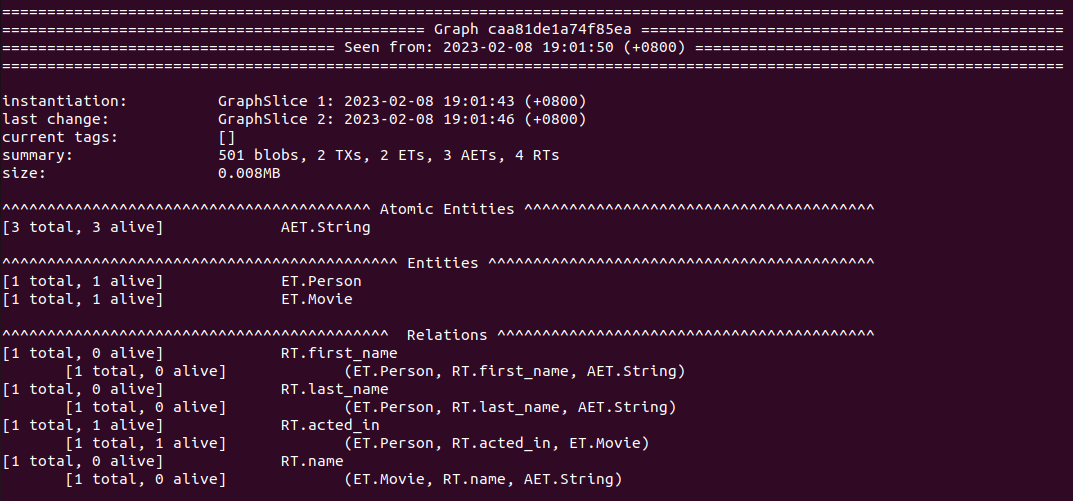
yo-ing the database gives you a summary of it outputted in the form of ASCII (SVG in the future). User can look at information such as the size of the database, number of entities and relations, when was the last transaction made, and etc.
Relational Data
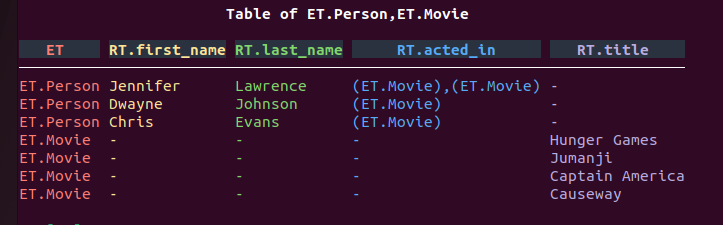
ZefDB is a graph-relational database. For those familiar with relational data, it's common to think in terms of tables. To view data in a tabular form, run:
db | now | all | ui.to_table | show
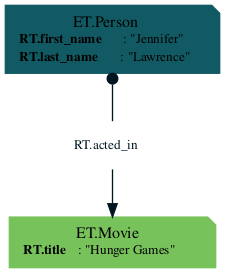
Graph Data
Data in ZefDB can also be viewed in graphical form. Zef has incorporated GraphViz as one of our native operator.
User might need to manually install graphviz if there machine doesn't already have it. Follow the instruction from here to install the package according to your OS.
db | now | all | graphviz | collect
You'll see the following output:
Creating and Updating Data
We have now successfully added the initial data into the database.
Let's add two more entry into our database:
more_data = [
    ET.Person(
        first_name="Dwayne",
        last_name="Johnson",
        acted_in=ET.Movie(title="Jumanji")
    ),
    ET.Person(
        first_name="Chris",
        last_name="Evans",
        acted_in=ET.Movie(title="Captain America")
    )
]

handles = more_data | db | run
Suppose an actor has acted on a new movie, and we want to add this information into the database as well:
new_data = (
            jen_law,                    # Source
            RT.acted_in,                # Relation
            ET.Movie(title="Causeway")  # Target
        )

new_handle = new_data | db | run
Here, we use the "Triple Notation" (Source, Relation, Target) to declare our new_data. Why did we not use the object notation as we used before?
# This will replace Hunger Games with Causeway
jen_law(
    acted_in=ET.Movie(name="Causeway")
)

# This will create a new instance of Jennifer Lawrence
ET.Person(
    first_name="Jennifer",
    last_name="Lawrence",
    acted_in=ET.Movie(name="Causeway")
)
We can think of the object notation as declaring the state of the database that we want to achieve, using it here would replace the original relation ET.Movie(name="Hunger Games") with ET.Movie(name="Causeway") instead of creating a new relation, which is not desired.
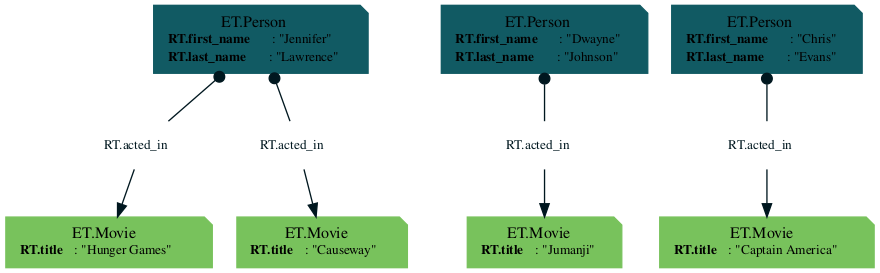
Let's look at the graph again:
db | now | all | graphviz | collect
Querying the data
Let's say we want know how many movies Jennifer Lawrence has acted in, we would do:
query = (
    ET.Movie &
    Where[
        Ins[RT.acted_in] |
            filter[
                (Z | F.first_name == "Jennifer")
                & (Z | F.last_name == "Lawrence")
        ]
    ]
)

result = (
    db
    | now           # get the latest state of the DB
    | all[query]    # list all items that satisfy the query
    | count         # how many entities (movies) were returned?
    | collect       # trigger evaluation
)

print(result) # 2
From this example, we can see how Zef allows us to write succint and readable code with the powerful piping syntax and composable operators. We will discuss more about ZefOp in one of the following tutorial.
Querying the data - Time Traveling
Now, we want answer the same question as above, maybe sometime ago. We can access any previous time slice with ease with ZefDB by doing:
result = (
    db
    | now             # get the latest state of the DB
    | time_travel[-1] # Moving -1 relative slice from now
    | all[query]    # list all items that satisfy the query
    | count         # how many entities (movies) were returned?
    | collect       # trigger evaluation
)

print(result) # 1
We've traversed one DB state earlier with respect to the current state, which the fact that J. Lawrence has not yet acted in Causeway . The result of the query will then become 1. There are few ways to traverse time in ZefDB, check out this topic.
Persisting Database
Persisting graphs requires a free ZefHub account. See this [[ZefDoc - Quick Install Guide#Sign up for a free Zefhub account|section]] on getting your ZefHub account.
db | sync[True] | run
This persists, syncs, and distributes all future changes via ZefHub in real-time. Anyone can access the db anytime and anywhere as long as they have the nessecary permission to do so.
Recap
To summarize, so far, we have learned how to manage our data with ZefDB, exposed to the visualization toolkit of Zef, and have been introduced to the powerful querying and data transformation capabilities of the library.
Next, we will learn how we can deploy a simple backend, exposing an interface to ZefDB via GraphQL API.